DIY: 10 Steps For Building Your Own Cardboard Cat Castle
Do you have a cat? Do you also have a bunch of cardboard boxes lying around after a big move?
There’s a way to find a use for them while also providing a new playhouse or home for your feline friend. Build her a cardboard cat castle! Materials Needed: Cardboard Boxes (at least 3)
Box cutter (Scissors might work, too)
Pen
Paint (optional)
Glue
The great thing about creating a cardboard cat castle is how cheap and easy it is. You don’t even have to be all that creative, and you can make it as big or as small as you please depending on the amount of boxes you have.
Cardboard Boxes (at least 3)
Box cutter (Scissors might work, too)
Pen
Paint (optional)
Glue
The great thing about creating a cardboard cat castle is how cheap and easy it is. You don’t even have to be all that creative, and you can make it as big or as small as you please depending on the amount of boxes you have.
Step 1
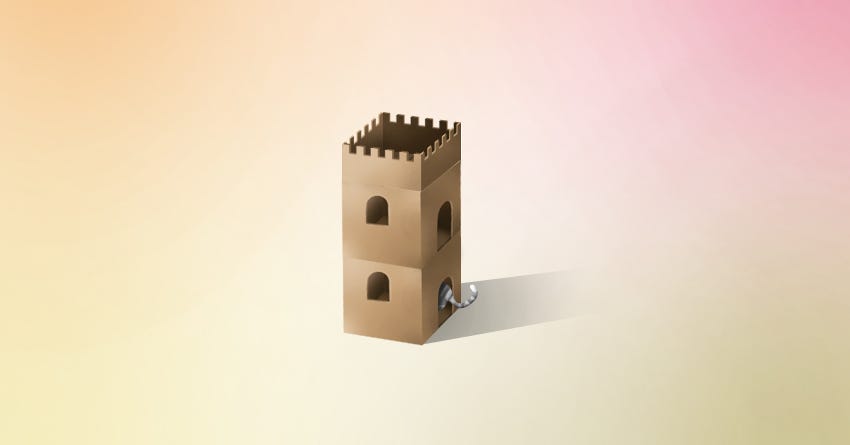
Decide on the size. We’re going to go with a simple two-story castle here, but you can add on more as you go.Step 2
Lay your cardboard boxes flat on the ground next to each other. They shouldn’t be in the shape of boxes just yet.Step 3
 Use a pen or marker to draw the windows and doors of your castle. These can be in any shape you’d like, but we prefer the arched shape of most medieval castles and doors for that more authentic feel. Keep in mind that the door needs to be large enough for your cat to get in and out of. You might also want to add one to both boxes so your kitty will have an exit on both floors.
You should be drawing the designs into the sides of the boxes, not the bottom or top flaps. Leave those alone, you’re going to need them in a bit.
Use a pen or marker to draw the windows and doors of your castle. These can be in any shape you’d like, but we prefer the arched shape of most medieval castles and doors for that more authentic feel. Keep in mind that the door needs to be large enough for your cat to get in and out of. You might also want to add one to both boxes so your kitty will have an exit on both floors.
You should be drawing the designs into the sides of the boxes, not the bottom or top flaps. Leave those alone, you’re going to need them in a bit.
Step 4
Now, use a box cutter or scissors to cut out the windows and doors. Since you’re cutting in the middle of the boxes rather than the bottom, scissors might be a tad more difficult to work with.Step 5
 Once you’re done cutting your pieces out, it’s time to turn your cardboard into actual boxes. You’re going to need to glue the flaps together for extra support here. You don’t necessarily have to, but it’ll keep the floors a little more flat than trying to fold them into each other to keep them in place. Close and glue both the bottom and top of each box.
Step 6
 Now you need to make a hole to allow your cat to pass between floors once she’s in the castle. We recommend choosing a corner of one half of the roof of your bottom box and removing it with the box cutter. Then do the same to the same side of the top box.
Step 7
 It’s time to stack your castle! Place glue along the top of the bottom portion of your castle. Now, place the top section on top of the bottom, making sure the holes for your passage align.
Step 8
 Time for you to make the roof. The third cardboard box should still be flying flat on the floor. Cut off the top and bottom flaps. Now, if you’re unfamiliar with the shape of a castle, you might want to get on Google and look one up. If you’re a fan of chess you probably know the rook looks similar to a castle wall. Draw that design on the sides of the box.
Step 9
 Now cut out the design and stand it on top of the castle. Glue the top on. It should follow the edges of the top of your castle all the way around.